Course Versioning
Written By Aladia Support
Last updated 11 months ago
This guide outlines a comprehensive approach to course versioning, detailing how to create, manage, and track different versions of a course. It explains the steps required before versioning, including filling in course info, billing, categories, certificates, and content. Additionally, it outlines the different types of versions: Current, Published, Previous, View, and Rejected.
This guide covers essential versioning actions such as editing version info, restoring versions, comparing versions, publishing, and viewing logs. Each section includes expected outcomes to ensure accurate version tracking and smooth course modifications, allowing users to effectively manage course history and updates.
CAUTION
Pre-requisites are needed:
Before testing course versioning, users need to complete the following steps to create course versions:
Fill out (Course Info, Billing, Certificates, and Course Content).
Publish the course to create the first published version.
Repeat this process twice, modifying the content and publishing the course each time to create multiple versions. After that, the course will need to be reviewed before the user can update the course content..
After completing these steps, Users will find the following versions:
Current Version
Published Version
Previous Version
Understand Versioning
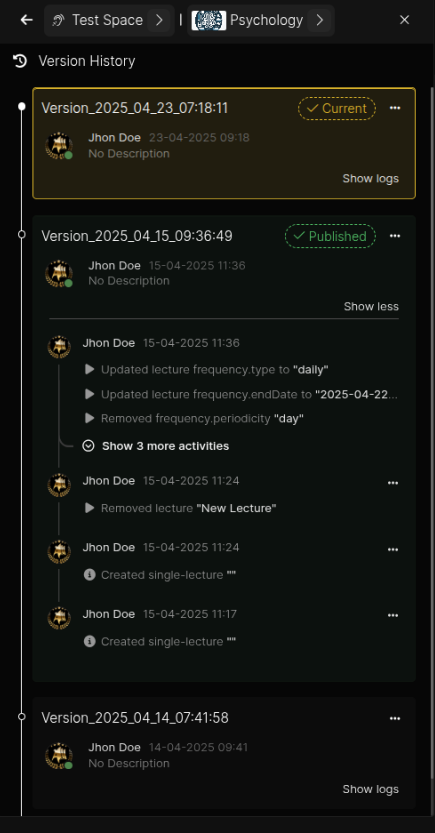
Versioning allows users to track changes made to their course with a version history. Users can explore a timeline of modifications dating back to the course's creation.
The Number of Available Versions
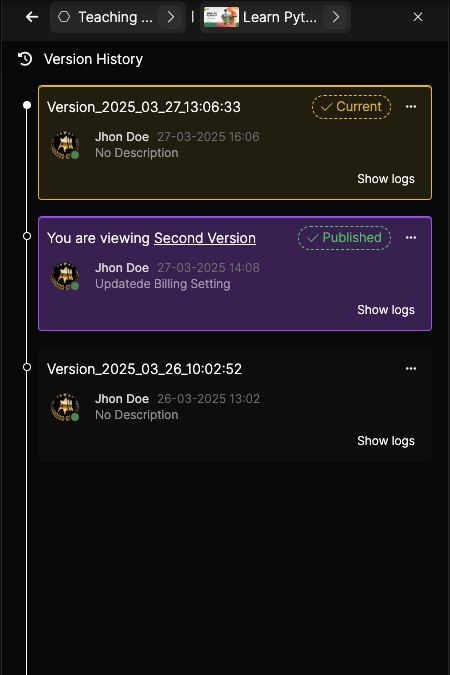
Current: A yellow card labeled with Current.
Published: A green card labeled with Published.
Previous: A neutral card with no label.
View: A violet card with no label.
Rejected: A red card labeled with Rejected.
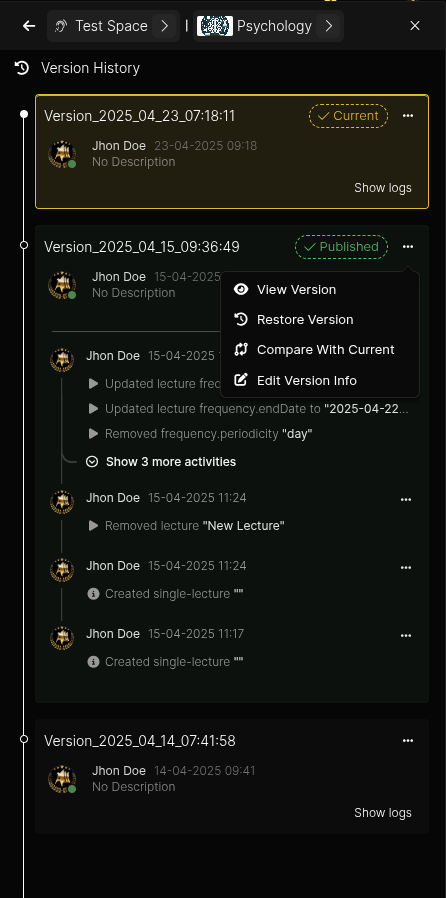
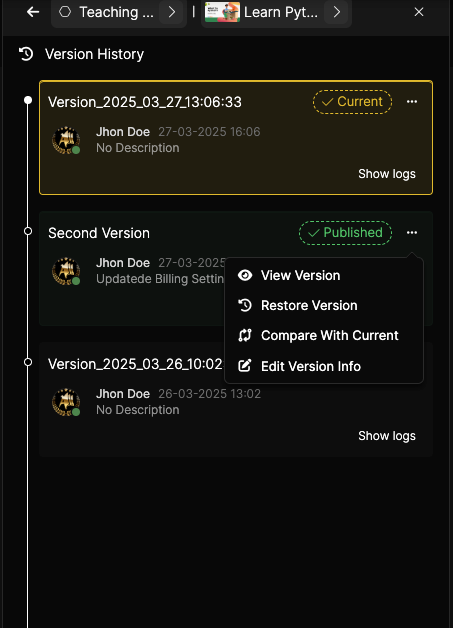
General Versioning Options
View Version: Open and view a version as a snapshot in time.
Restore: Restore a previous version to edit course information.
Compare with Current: Compare a previous version with the current version.
Edit Version Info: Modify the version name and description.
Publish Version: Publish a version by adding a name and description to autosaved versions.
Show Logs: Open a detailed version history to view all changes made to the course, including course info, categories, and content updates.
Each version card includes:
The title of the version :
Current : Display the current course title.
Published : Display the published course title.
User thumbnail (profile image)
Date of the last change
Version description
Three-dot option menu
Show Logs button
Current Versioning
Actions Available for the Current Version
Edit Version Info
Publish Version
Show Logs
Edit the Version Info
Open the Course Builder by clicking the course. In the Version Section, click the three-dot menu next to the Current label.
Select Edit Version Info from the menu. A pop-up will appear. Modify the version name and add a description.
Click on the Save button to apply changes or Delete to discard them. If saved, the version name and description will update accordingly.
Access the Published Version
NOTE: To access a Course, it must be published and reviewed by the Aladia team.
Click the course to open course builder. In the Version Section, click the three-dots menu next to the Current label.
Select Publish Version from the menu.
The current version will be published, and the version label will turn green to indicate its published status.
View Logs
Click on the Show Log button to expand the version details. Inside, users will find all changes made to the current version.
To track changes:
Modify the course title, thumbnail, language, description, goals, or requirements.
Save the course and reopen the version menu.
Click on the Show Logs button in the Current Version section.
Click the Show Activities to expand the log list for a full view.
Video Guide:
Published Versioning
Contents of a Version Card
View Versions
Restore
Compare with Current
Edit Version Info
Show Logs
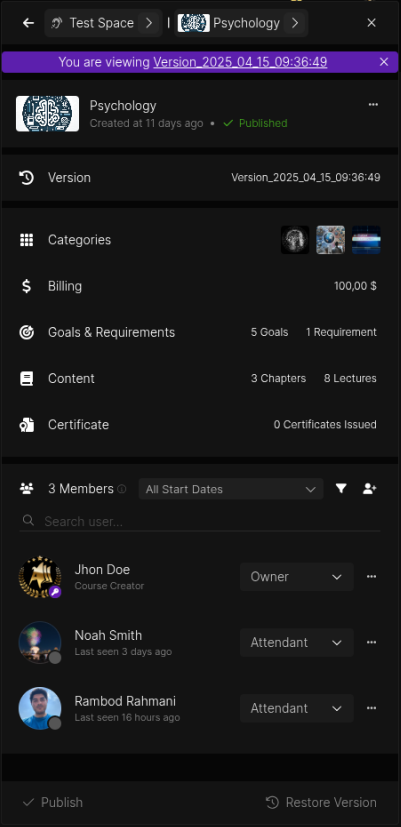
Access a Published Version
Open the Course Builder. In the Version Section, click the three-dots next to the Current label.
Select View Versions from the menu. A violet label will appear at the top, indicating that you are viewing a specific version.
In View Mode, editing course content is not allowed. To exit, click the X in the violet label. A pop-up will ask you to confirm or cancel the exit.
Restore a Version
Open the Course Builder. In the Version Section, click on the three-dot menu next to the Current label. Select Restore from the menu. A pop-up will appear asking for confirmation.
Click the Confirm button to restore the version, making it the Current Version.
Compare with the Current Version
Open the Course Builder. In the Version Section, click the three-dots menu next to the Current label.
Select Compare with Current. A comparison panel will slide in from the right. It will display:
Left panel: Current Version
Right panel: Published Version
At the bottom: click on the Restore Version to make the Published Version the new Current Version.
Access the Edit Version info
In the course builder, go to the Version section and click the three-dot menu next to the Current label. From the menu, select Edit Version Info to open a pop-up window.
In the pop-up, users can update the Version Name field and able to add a description in the Description field.
Click on the Save button to apply the changes or Delete to close the pop-up without saving. The version name and description will update accordingly.
View the Show Log
Click the Show Log button to expand the version and view its details. Inside, users will find all the changes made to the current version.
No further changes will be displayed, as the course has already been published.
Previous Versioning Actions
Contents of Previous Versioning
View Versions
Restore
Publish Version
Compare with Current
Edit Version Info
Show Logs
Actions Available in View Mode
Exit View Mode
Restore
Publish Version
Compare with Current
Edit Version Info
Show Logs
Show Log Options
Access a Previous or Published Version
Navigate to the Version section in the course builder. Select a previous or published version and click the View Versions from the menu.
A violet label will indicate "You are viewing [Version Name]" at the top. Editing is disabled; users can only view the content.
To access the Exit Version :
Click the three-dot menu in the view card to open the menu.
Select Exit Versions to return to the previous version.
Restore a Version
Click the three-dot menu in the view card and select Restore.
A pop-up will appear with Delete (cancel) or Confirm (restore) options. Confirming will make this version the current one.
Compare with the Current Version
Click on the three-dot menu and select Compare with Current. A side panel will show the two versions:
Left: Current version.
Right: Viewed version.
A button at the bottom lets the user to restore the viewed version.
Editing Version Information
Click on the three-dot menu and select the Edit Version Info. Update the version name and description in the pop-up.
Click Save to apply changes or Delete to close without saving.
Viewing the Show Logs
Click the Show Logs button to expand version details. View all changes made to the current version.
No further changes appear in view mode.
Show logs options
Viewing a Log: Users can only view a log when the main versions card is in Current, Published, or Previous.
Restoring a Log:
Users can only restore a log when the main versions card is in Published or Previous.
Users can restore logs inside the Current Version, except for the last log in the Current Version, which does not have three-dot menu.
Access the Log in View Mode:
Open the published/restored card and click Show Logs.
When the log appears, click the three dots on the right. Select View Version from the menu to enter view mode. Follow the instructions from earlier to exit view mode.
Restore a Log:
Open the published or restored card and click Show Logs.
Click on the three-dot menu and select Restore from the menu. The log will become the current version, and the card will appear on top with the Current label.
Viewing a Log in the Current Card (Edge Case):
Open the Current card and click the Show Logs. When the log appears, click the three-dot menu and select View Version.
Enter view mode, then return to the Version menu. The first card will now appear in violet with a Current label.